How to setup a remote development environment over SFTP (working copy)
This article explains how to setup the server and client to work with a remote working copy.
To properly understand this post you should have read the previous post, When to setup a remote development environment over SFTP (working copy).
To have the enviroment up and running you must setup once the server, and then apply the configuration of the client in every developer machine. But the client side is very simple and requires no installation at all.
Here's how:
Server Side
These are the basic steps you need to do to get the server ready to create the remote working copy:
Create a catch-all DNS
You should point a domain to the development machine. It is recommended to use a different one than the live DNS, or you can use a fake entry in the hosts file of the clients, but it's not very convenient. In this new domain you should configure a cath-all behavior (wildcard).
As example, if your domain is awesomedevelopers.com than you should create a wildcard *.awesomedevelopers.com in your DNS panel so any request goes there.
Limit the access to the server
The idea is to disallow any possible indexation to Google and do not let others see your page while you are working on it. Some methods you can use:
- Simple IP control through iptables or similar
- .htacces file or apache control
- header with www-authenticate
Install all the services you are going to need in this machine.
PHP, Mysql, Apache, Redis... anything that you might need must be installed in the server. A clone of the production machine is recommended. Avoids hearing in the future sentences like "In my working copy worked like a charm".
Configure the working copies
Create the folders where the working copies go, for instance, this creates the working copies structure for the users named jta, api and alo.:
mkdir -p /var/www/wc/{jta,api,alo}
Then create a user and password for each. Set desired permissions and clone the code at this stage if necessary (can be uploaded later):
adduser jta
adduser api
adduser alo
passwd jta
passwd api
passwd alo
Modify the Virtual Hosts
To make every working copy subdomain point to this folder. Example:
   ServerName alo.awesomedevelopers.com
   DocumentRoot "/var/www/wc/alo/htdocs"

    ServerName api.awesomedevelopers.com
    DocumentRoot "/var/www/wc/api/htdocs"

    ServerName jta.awesomedevelopers.com
    DocumentRoot "/var/www/wc/jta/htdocs"
Client Side
Then in the client, based on the cross-platform PHPStorm IDE the followint steps is all you have to do to start working with the working copy. It is pretty fast and does not involve working copies or service maintenance.
All you have to do is create a new project, or reuse an existing one and then configure the editor to upload files automatically to the server.
In detail...
Configure the deployment settings
The first thing to do is to configure the deployment server. PHPStorm needs to know where the machine is. To do so, go to:
Tools > Deployment > Configuration
Nothing special to say here, except that make sure to set correctly the root path which is the real path in the server. The user should have enough permissions to write in the server.
Then go to the "Mappings" tab and add a couple of slashes if your web has no additional path needed in the URL:
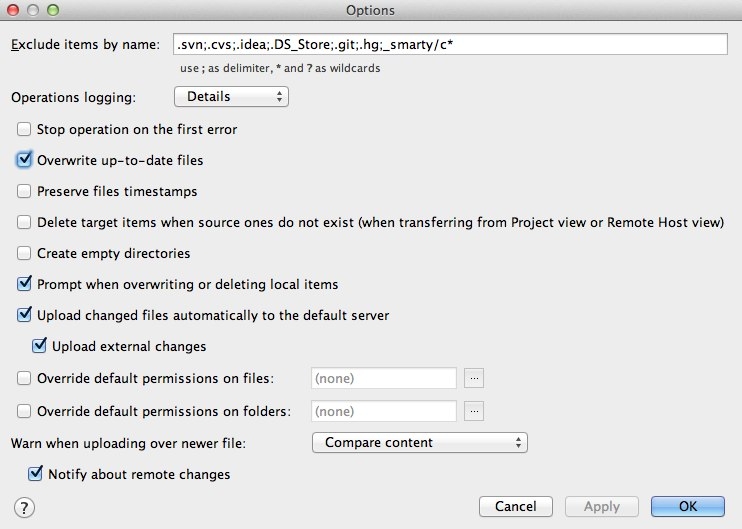
Configure the deployment behaviour
Tools > Deployment > Options
Things you should take care of here are:
- Items you don't want to upload, such as the .git repo.
- The level of logging. I always set it to Details so I can see what the IDE is doing anytime in the File transfer window
- Overwrite files
- Create empty directories (if you usually work with git, this is something you already know how to handle)
- Automatic upload and external changes, are the 2 most important checkboxes. They make the IDE puts everything in the remote server as you work.
- Notify remote changes. This option will show a yellow bar asking you what to do if the file has changed in the remote server. Very convenient.
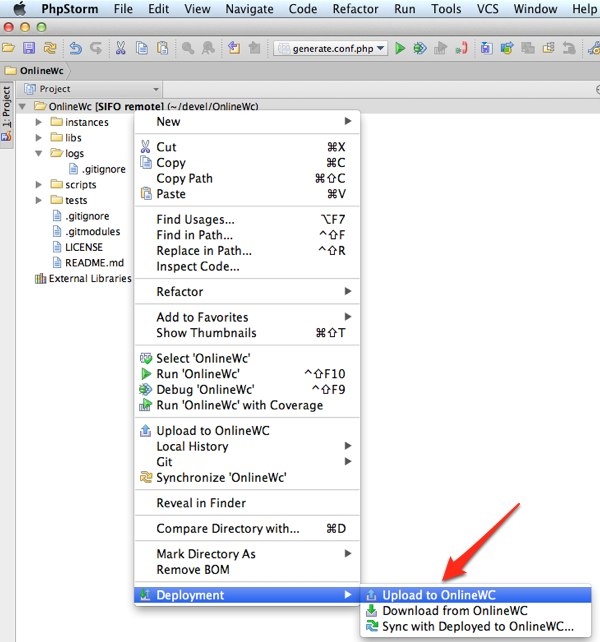
Upload the code to the server
For the first time. If the code is already in the server and you start fresh then do it the other way around, download it from the server. To upload:
If the Menu "Deployment does not show up" then you need to go back to the deployment configuration and set the remote server as default (a small green tickbox in top of the server name)
Tick automatic upload

And now, PHPStorm will upload everything to the server. You don't need to save because PHPStorm does it automatically when the tab lose the focus (while you switch to the browser)
Hope this seres of articles help :)