Simple Varnish Installation
The first thing to do is to make sure your application is passing the headers properly. At least you'll need this (in PHP):
// Let's say Varnish caches for 12 hours:
$cache_max_age = 60*60*12;
header( "Cache-Control: public, must-revalidate, max-age=0, s-maxage=$cache_max_age" );
Varnish installation (CentOS/Redhat):
RPM taken from https://www.varnish-cache.org/installation/redhat
rpm --nosignature -i https://repo.varnish-cache.org/redhat/varnish-3.0.el5.rpm
After adding the package:
yum install varnish
If you have another Linux see in the link, is more or less the same.
Now Varnish is installed. What we want to do next is to configure Apache to listen in another port and let the port 80 for Varnish. Varnish will be the one requesting to Apache the html and saving it in the memory for later accesses.
We will use as example the port 8080 for Apache. The first thing is to tell Varnish, where Apache will be listening to:
vi /etc/varnish/default.vcl

# Change the port to 8080, like this. Leave the rest of file as is:
backend default {
  .host = "127.0.0.1";
  .port = "8080";
}
Then we have to change Varnish to make it listen in port 80:
vi /etc/sysconfig/varnish

# Change VARNISH_LISTEN_PORT variable to 80, like this:
VARNISH_LISTEN_PORT=80
And now in the Apache settings make it listen to 8080:
vi /etc/httpd/conf/httpd.conf
# Change the Listen variable to 8080:

Listen 8080
If you use Named Virtualhosts using the port number (e.g: You declare them with NameVirtualHost *:80) you'll need to change them to 8080 too. I usually store my virtual configurations under this file, use yours:
vi /etc/httpd/conf.d/virtual.conf

# You can replace all the 80 by 8080 easily with vi with (take care there aren't other things changed):
:%s/80/8080/g
And now hold your breathe. Stop both services and start them again to make changes effective:
/etc/init.d/httpd stop
/etc/init.d/varnish stop
/etc/init.d/httpd start
/etc/init.d/varnish start
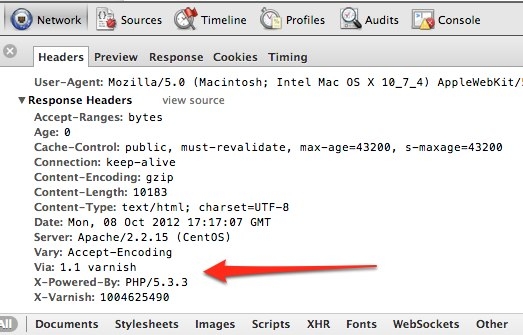
Your application should be served by Varnish now. Check in the "Network" tab of your Google Chrome or Firefox that the headers are properly passed: